Dinosaurs Teaching Theme
Dinosaur Books
-
Patrick’s Dinosaurs by Carol Carrick
-
What Ever Happened to Patrick’s Dinosaurs? by Carol Carrick
-
What Ever Happened to the Dinosaurs? by Bernard Most
-
If the Dinosaurs Came Back by Bernard Most
-
Digging Up Dinosaurs by Aliki
-
My Visit to the Dinosaurs by Aliki
-
Danny and the Dinosaur by Syd Hoff
-
Bones, Bones, Dinosaur Bones by Byron Barton
-
Curious George and the Dinosaur by Margret and H.A. Rey
-
Dinosaur Time by Peggy Parish
-
A Dozen Dinosaurs by Richard Armour
-
A First Look at Dinosaurs by Millicent Selsam and Joyce Hunt
-
Dinosaurs by Gail Gibbons
-
The Dinosaur Who Lived in My Backyard by B. G. Hennessy
-
Can I Have a Stegosaurus, Mom? Can I? Please!? by Lois G. Grambling
-
Dinosaurs, Dinosaurs by Byron Barton
-
Time Flies by Eric Rothman
-
Dinosaur Roar! by Paul and Henrietta Stickland
-
Count-A-Saurus by Nancy Blumenthal
-
The Tyrannosaurus Game by Steven Kroll
-
Dinosaur Dream by Dennis Nolan
-
Dazzle the Dinosaur by Marcus Pfister
-
Dinosaurumpus by Tony Mitton
Poems and Songs
Tyrannosaurus Rex, My Dear
Tune: “John Jacob Jingleheimer Schmidt”
Repeat 3 times.
Tyrannosaurus rex, my dear,
(Show claws, then fold hands across chest.)
You cause such fear!
(Frightened look on face.)
When your sharp teeth you show,
(Point to bared teeth.)
I know it’s time to go!
(Quickly flutter hands away from body.)
Tyrannosaurus rex, my dear,
(Show claws, then fold hands across chest.)
Da-da-da-da-don’t eat me!
(Shake finger in front of body.)
PLEASE! (Last verse only.)
(Fold hands together in front as if to beg.)
All Around the Swamp
Tune: “The Wheels on the Bus”
Pteranodon’s wings went flap, flap, flap;
Flap, flap, flap; flap, flap, flap.
Pteranodon’s wings went flap, flap, flap,
All around the swamp.
Tyrannosaurus Rex went grrr, grrr, grrr;
Grrr, grrr, grrr; grrr, grrr, grrr.
Tyrannosaurus Rex went grrr, grrr, grrr,
All around the swamp.
Triceratops horns went poke, poke, poke;
Poke, poke, poke; poke, poke, poke.
Triceratops horns went poke, poke, poke,
All around the swamp.
Apatosaurus’ mouth went munch, munch, munch;
Munch, munch, munch; munch, munch, munch.
Apatosaurus’ mouth went munch, munch, munch,
All around the swamp.
Stegosaurus’ tail went spike, spike, spike;
Spike, spike, spike; spike, spike, spike.
Stegosaurus’ tail went spike, spike, spike,
All around the swamp.
Dinosaur Ditty
Tune: “Three Blind Mice”
Di-no-saurs! Di-no-saurs!
Lived long ago, lived long ago.
Some were little as chickens, you see.
Some were so very much bigger than me!
Oh, wouldn’t you like to be able to see di-no-saurs?
More Dino Poems
Dinosaur Pie & Dinosaur Stomp from The K Crew
Dinosaur Song
Tune: “Bringing Home a Baby Bumblebee”
“I’m bringing home a baby dinosaur,
Won’t my mommy hide behind the door?
I’m bringing home a baby dinosaur.”
Stomp, stomp, stomp right through the door.
“I’m bringing home a baby dinosaur,
Won’t my Daddy fall down on the floor?
I’m bringing home a baby dinosaur.”
Stomp, stomp, stomp right through the door.
Literacy Activities
Student Book: “BIG!”
Adapted from Kim’s Class Books
Students each receive two simple dinosaur blackline drawings, preferably of a long-necked dinosaur such as a Brachiosaurus. One dinosaur should be larger than the other to emphasize the concept of “big.”
Students color both dinosaurs. They then cut apart the larger dinosaur and glue the appropriate body parts onto individual pages of their books, matching each part to the text.
Book Pages:
- Big feet. Students glue on the dinosaur’s feet.
- Big tail. Students glue on the tail.
- Big neck. Students glue on the neck.
- Big head. Students glue on the head.
- Big body. Students glue on the body.
- Big appetite. Students draw or glue a picture of a tree.
- Little brain. Students glue a dried pea onto the page.
- Big word! Students glue on the smaller dinosaur picture and stamp or cut out letter squares to spell D-I-N-O-S-A-U-R.
Making the Cover:
Use any color of construction paper for the cover. Possible titles include “Big Parts!”, “Big Things”, or simply “Big!”
Print the title on sentence strips for students to cut out and glue onto their covers. Students can decorate their books with dinosaur stamps, stickers, or dinosaur footprints.
Make a Reading Pointer:
Create a reading pointer by gluing a dinosaur sticker to one end of a craft stick.
Kim’s class books typically include a pocket glued to the inside back cover to store the pointer. Students use it to point to words as they reread their books.
Patterned Poem: If I Were a Dinosaur
Adapted from Mrs. Burns’ Site
Activity Instructions:
Read A Dinosaur Named After Me by Bernard Most.
After reading, show students pictures of different dinosaurs and compare their physical characteristics. Discuss how some dinosaurs walked on two legs while others walked on four, and how some had long necks, horns, spikes, or other distinctive features.
Have students create their own dinosaurs using Crayola Model Magic. Once their creations have dried, let students paint them with tempera paint.
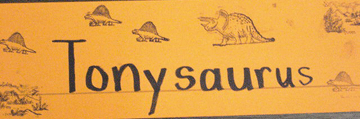
Invite students to name their dinosaurs after themselves. For example, Mary might create a “Maryosaurus Rex,” while Ed might invent an “Edguanodon.”
Students can then write poems about their imaginary dinosaurs using the following pattern.
If I Were a Dinosaur
If I were a dinosaur,
A __________________ I would be.
I would eat __________________
And __________________ I would see.
But since I’m not a dinosaur,
I am happy to be me!
Other Student Book Ideas
If I Were a Dinosaur…
Create a student-made book using sentence starters on each page. Students complete the sentences and illustrate their responses.
My Dinosaur Days Booklet
Source: The Mailbox, Pre/K, January/February 1989
What Can Dinosaurs Do?
Source: The Education Center (TEC251)
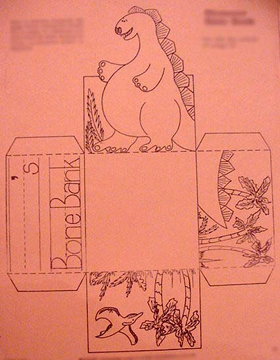
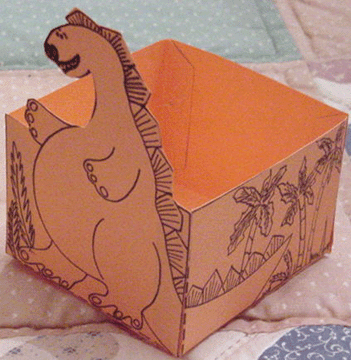
Bone Bank
Materials:
- Tagboard or cardstock
- Dinosaur and tropical-themed pictures (palm trees, ferns, etc.)
- Small paper bone shapes
- Markers or crayons
Instructions:
Fold a piece of tagboard into a box shape to create a “Bone Bank.”
Decorate two sides of the box with tropical scenes featuring palm trees and ferns. Add a dinosaur picture to the third side.
Label the fourth side “__________’s Bone Bank” with a space for the student’s name.
Write letters, words, or numbers that students need to practice on small paper bone shapes.
Students read or identify the information on each bone, then place it into their Bone Bank.
Learning Opportunities:
This activity can be adapted for letter recognition, sight word practice, number identification, or other skills that need reinforcement.
Journal Topic: If I Had a Dinosaur
Play Raffi’s song, If I Had a Dinosaur. After listening to the song, have students complete the following sentence starter and illustrate their responses:
If I had a dinosaur, I would ____________________.
Other Literacy Resources
Patrick’s Dinosaurs – Comprehension Worksheets
Blackline worksheets relating to reading comprehension of Patrick’s Dinosaurs by Carol Carrick.
Source: Worksheet Magazine, Kindergarten, April/May/June 1991
Math Activities
One-to-One Correspondence and Counting
Dino Hop Game
Materials:
- A strip of paper with 17 one-inch squares
- A small toy dinosaur
- One die
Instructions:
This is a game for two players.
- Make a straight line of 17 one-inch squares. You can use a different number of squares, but the total must be odd so there is a center square.
- Place a toy dinosaur in the center square (square nine if using 17 squares).
- The first player rolls the die and moves the dinosaur toward their end of the line by the number of spaces shown.
- The second player rolls the die, turns the dinosaur around, and moves it toward their end of the line.
- Players continue taking turns, moving the dinosaur back and forth until one player reaches their end of the line.
Digging for Dinos
Materials:
- Small plastic dinosaurs
- A tub or sensory bin filled with sand
- Small containers for collecting dinosaurs
Instructions:
Bury small plastic dinosaurs in a tub of sand. Give each student a container and let them dig through the sand to find the hidden dinosaurs.
After digging, students count how many dinosaurs they collected.
Sorting and Graphing
Triceratops Tromp
Source: The Education Center, Kindergarten, January
Materials:
- Triceratops pictures in three different sizes
- Three colors of construction paper
- Yarn or string
- Hole punch
- Three hula hoops
- Lively music
Preparation:
Create a blackline drawing of a Triceratops in three different sizes. Copy the dinosaur pictures onto three different colors of paper.
Cut out the dinosaurs, punch holes in them, and attach yarn to make necklaces.
Instructions:
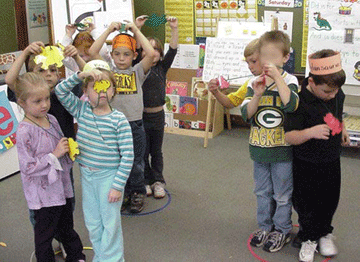
- Place three hula hoops on the classroom floor.
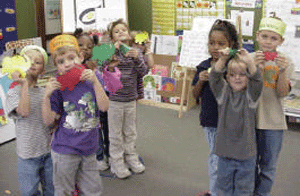
- Give dinosaur necklaces to nine students, using combinations of the three sizes and three colors.
- Explain that the students will perform a dance called the Triceratops Tromp.
- Play lively music and let the students dance around the hula hoops.
- Call out either “Size!” or “Color!”
- Students must quickly sort themselves into the hula hoops according to the category called.
- Repeat the activity, allowing other students to take turns.
Skills Practiced: Sorting, classifying, recognizing colors, and comparing sizes.
Sorting and Graphing
Dinosaur Sorting
Give students dinosaur manipulatives or paper cutouts. Have them sort the dinosaurs by color, type, or other characteristics.
Favorite Dinosaur Graph
Survey the class to find out each student’s favorite dinosaur. Create a class graph to display and compare the results.
Sort and Graph Dinosaurs
Give each student a handful of dinosaur manipulatives or cutouts. Have students sort their dinosaurs into groups and then create a graph showing how many dinosaurs are in each category.
Patterning
Dinosaur Patterns
Use dinosaur stamps, dinosaur manipulatives, or different types of pasta to create repeating patterns.
Have students copy, extend, and create their own patterns.
Subtraction Readiness
Dinosaur Take-Away Game
Materials:
- 10 small dinosaur manipulatives per student
- One die per group
Instructions:
- Give each student 10 small dinosaurs and have them arrange the dinosaurs in a straight line.
- Students take turns rolling a die.
- After each roll, students remove the corresponding number of dinosaurs from their lines.
- Continue taking turns until a player rolls the exact number needed to remove all of their remaining dinosaurs.
- The first student to remove all 10 dinosaurs wins!
Measurement
How Big Were Dinosaurs?
Materials:
- Measuring tape
- Playground or other large open space
- Chalk or markers
Instructions:
Use an extended measuring tape to demonstrate the approximate lengths of different dinosaurs.
Take students outside to the playground and mark off the lengths to help them visualize just how large dinosaurs were.
Example Dinosaur Lengths:
- Apatosaurus – 70 feet
- Tyrannosaurus Rex – 50 feet
- Stegosaurus – 25 feet
- Ankylosaurus – 15 feet
- Compsognathus – 2 feet
These are approximate lengths used for the activity. Actual dinosaur sizes varied.
Measuring with Dinosaurs
Materials:
- Yarn
- Measuring tape
Instructions:
Choose a dinosaur and cut a piece of yarn to represent its approximate length.
Use the yarn as a nonstandard measuring tool to investigate the sizes of different areas around the school.
Have students explore questions such as:
- How many dinosaur lengths long is the playground?
- How many dinosaur lengths long is the hallway?
- How many dinosaur lengths long is the gym?
- How many dinosaur lengths long is the school?
Students can estimate before measuring and compare their predictions with their results.
Division Readiness
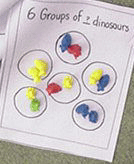
Dinosaur Groups
Adapted from Math Through the Alphabet by Sue Kerr
Materials:
- 12 small plastic dinosaurs or dinosaur pictures
- An egg carton
- Six worksheets with different numbers of grouping boxes
Preparation:
Place one dinosaur in each of the 12 sections of an egg carton.
Prepare six worksheets, each with a different number of large boxes to represent groups.
Instructions:
Explain to students that the dinosaurs are going exploring. Each day, they decide to travel in a different number of equally sized groups.
On the first day, all 12 dinosaurs stay together in one group. On the second day, they divide into two equal groups.
Each day, students try dividing the 12 dinosaurs equally into the number of groups shown on their worksheet.
If the dinosaurs cannot be divided equally, they decide to stay home that day. Students mark an X on that worksheet.
Worksheets:
- 1 Group of ____ Dinosaurs — One large box
- 2 Groups of ____ Dinosaurs — Two large boxes
- 3 Groups of ____ Dinosaurs — Three large boxes
- 4 Groups of ____ Dinosaurs — Four large boxes
- 5 Groups of ____ Dinosaurs — Five large boxes
- 6 Groups of ____ Dinosaurs — Six large boxes
Teacher Answer Key:
- 1 group: 12 dinosaurs
- 2 groups: 6 dinosaurs in each
- 3 groups: 4 dinosaurs in each
- 4 groups: 3 dinosaurs in each
- 5 groups: Cannot divide equally (mark X)
- 6 groups: 2 dinosaurs in each
Skills Practiced: Equal grouping, counting, number sense, and early division concepts.
Science Activities
Making Fossils
Materials:
- Clay
- Pie pans
- Small plastic dinosaurs
- Buttons, keys, rocks, or shells
- Plaster of Paris
Instructions:
- Spread clay approximately one inch thick in a pie pan.
- Have students press small objects, such as toy dinosaurs, buttons, keys, rocks, or shells, into the clay to create impressions.
- Carefully remove the objects from the clay.
- An adult pours approximately one inch of prepared Plaster of Paris over the clay, allowing it to fill the impressions.
- Once the plaster has completely hardened, remove it from the pie pan and separate it from the clay.
- Have students match the original objects to the impressions in their fossils.
Safety Note: An adult should handle the Plaster of Paris, following the manufacturer’s safety instructions. Keep dry plaster dust away from children.
More Fossils: Homemade Fossil Dough
Makes approximately 6–8 fossils
Materials:
- 2 cups flour
- 1 cup water
- 1 cup salt
- 6 tablespoons dry brown tempera paint
- Small pie tins
- Small objects for making impressions
Instructions:
- Mix the flour, water, salt, and dry brown tempera paint together to create a mud-like dough.
- Press the mixture into small pie tins and smooth the surface.
- Have students press small objects into the dough to create impressions.
- Carefully remove the objects, leaving their impressions behind.
- Set the fossils aside to dry for several days.
- Once dry, place the fossils and their matching objects in a learning center.
Challenge students to match each object to the impression it created.
Use nontoxic materials and supervise children when handling powdered paint.
Dinosaur Dig Center
Materials:
- Large tub or sensory bin filled with sand
- Clean, dried chicken wing bones
- Eggshells
- Small rocks and seashells
- Magnifying glasses
- Tweezers
- Small paintbrushes
- Pencils
- Writing paper
Preparation:
Bury the bones, eggshells, rocks, and seashells in the sand.
Instructions:
After reading books about dinosaurs, explain to students that they will become paleontologists and search for buried discoveries.
- Demonstrate how to gently brush away sand using a small paintbrush.
- Have students carefully uncover the buried objects.
- Students use tweezers to remove their discoveries and brushes to dust them off.
- Provide magnifying glasses so students can examine their finds more closely.
- Encourage students to sort, classify, measure, or graph the objects they discover.
Writing Center Extension: “I Found…”
Create a worksheet with the sentence starter:
I found ____________________.
Students can record their discoveries by drawing pictures, writing words using invented spelling, or referring to picture-word cards provided by the teacher.
Combine students’ pages to create a class book titled Our Fossil Finds.
If students are rotating through centers, they can rebury their discoveries for the next group to uncover.
Safety Note: Use commercially prepared replica bones or sanitized, blunt specimens rather than fragile or sharp animal bones. Select objects large enough to avoid choking hazards.
Dinosaur Dig
Source: Dinosaurs Unit by The K Crew
Fill tubs with sand and bury pretend dinosaur bones. Invite students to explore the sand and uncover the hidden “fossils.”
Students can use brushes and other excavation tools to practice the careful techniques used by paleontologists.
Dinosaur Characteristics
Carnivores and Herbivores
Create a classroom chart comparing meat-eating (carnivorous) and plant-eating (herbivorous) dinosaurs.
Discuss and compare characteristics such as:
- Number of legs used for walking (two or four)
- Shape of the feet and claws
- Shape and size of teeth
- Presence of horns, bony plates, spikes, or other protective features
- Types of food eaten
Provide dinosaur models or pictures and have students classify them as carnivores or herbivores.
Encourage students to look for physical clues that may help them determine what each dinosaur ate.
Dinosaur Skeletons
Materials:
- Dinosaur skeleton pictures or blackline drawings
- Transparency sheets
- Dinosaur outline pictures
Preparation:
Find dinosaur skeleton illustrations and copy them onto transparency sheets.
Trace the outer shape of each dinosaur without including its bones. Cut out the dinosaur outlines.
Instructions:
Give students dinosaur outline pictures and matching skeleton transparencies.
Have students place the skeleton transparencies over the correct dinosaur outlines to see how the bones fit inside each dinosaur’s body.
This activity helps students explore skeletal structures while practicing visual matching skills.
Dinosaur Trading Cards
Source: Copycat Magazine, November/December 1993
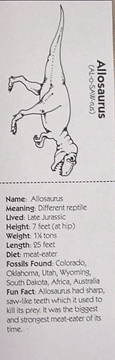
Create dinosaur trading cards similar in size to baseball cards.
Each card features a picture of a dinosaur on the front and interesting facts about the dinosaur on the back.
Students can collect, trade, sort, and compare their dinosaur cards.
Dinosaur Card Storage Case
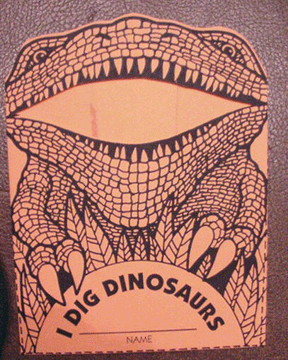
Create a special carrying case for the cards featuring a dinosaur face with an open mouth cutout. Students can store their trading cards inside the dinosaur-themed holder.
Extension Ideas:
Have students use their cards to compare dinosaur sizes, diets, and characteristics. They can also sort the cards into categories such as meat-eaters and plant-eaters.
Science Activities (Continued)
Dinosaur Report
Source: Monthly Reproducibles, Kindergarten, January
Send home an information sheet about a particular dinosaur, using an age-appropriate reference book or encyclopedia.
Parents can help their children read about the dinosaur and complete a simple Dinosaur Report using the information provided.
Dinosaur Report Worksheet
This dinosaur’s name is: ____________________
It measured: ____________________
It was a:
○ Plant eater
○ Meat eater
It walked on:
○ 2 legs
○ 4 legs
Its special features include:
Here is a picture of this dinosaur:
Draw or attach a picture of the dinosaur.
Another Dinosaur Dig
Materials:
- Plaster of Paris
- Vermiculite or sand
- Small plastic dinosaurs
- Paper cups
- Sand table or sensory bin
- Excavation tools and toothbrushes
Instructions:
- Mix vermiculite or sand into prepared Plaster of Paris.
- Pour the mixture into paper cups, hiding a small plastic dinosaur inside each cup.
- Allow the plaster to harden completely.
- Remove the hardened plaster “rocks” from the cups.
- Bury the rocks in the classroom sand table.
- Let students excavate the rocks to discover the hidden dinosaurs.
Safety Note: The original activity suggests large nails for excavation. For young children, use child-safe excavation tools instead. Adults should prepare the plaster, and students should wear eye protection while excavating.
Social Studies Activities
Paleontologists: Dinosaur Egg Hunt
Materials:
- Small plastic eggs
- Dinosaur stickers or other small dinosaur-themed surprises
- Sand table or sensory bin
Instructions:
Fill plastic eggs with dinosaur-themed surprises, such as stickers. You can also use premade dinosaur eggs from a classroom supply retailer.
Bury the eggs in a sand table and invite students to become paleontologists searching for dinosaur discoveries.
Have students carefully uncover the hidden eggs and examine what they find inside.
For young children, choose age-appropriate treats and objects that are not choking hazards.
Paleontologists: Chocolate Chip Excavation
Source: Dinosaurs Unit by The K Crew
Materials:
- Chocolate chip cookies
- Toothpicks or other suitable excavation tools
- Napkins or paper plates
Instructions:
Give each student a chocolate chip cookie and explain that they will practice excavation techniques similar to those used by paleontologists.
Students carefully use a toothpick to remove the chocolate chips from the cookie without breaking it apart.
Challenge students to see how many chocolate chips they can successfully uncover.
For younger students, substitute a child-safe tool for the toothpick.
Art Activities
Pasta Fossils
Materials:
- Potting soil
- White school glue
- Assorted dry pasta
- Zip-top plastic bag
- Paper or plastic plates
- Foam brushes
Instructions:
- Place assorted dry pasta in a zip-top plastic bag and seal it.
- Break the pasta into smaller pieces by gently stepping on the sealed bag.
- Combine approximately 1½ cups of potting soil with several tablespoons of white glue.
- Continue adding glue until the soil mixture holds together.
- Mold the mixture into a ball.
- Press the soil mixture onto a paper or plastic plate until it is approximately ½ inch thick.
- Arrange the broken pasta pieces on the soil to resemble a dinosaur skeleton.
- Press the pasta pieces gently into the soil.
- Use a foam brush to coat the entire surface with white glue.
- Allow the fossil to dry overnight, then carefully remove it from the plate.
Use clean, commercially packaged soil and nontoxic glue. Supervise children when handling small pasta pieces.
Dinosaur Eggs
Materials:
- Papier-mâché materials
- Small plastic dinosaurs
- Paint and brushes
Instructions:
Create dinosaur eggs using papier-mâché.
Place a small plastic dinosaur inside each egg before closing it. Allow the papier-mâché to dry completely, then let students paint and decorate their eggs.
Once the eggs have dried, students can “hatch” their dinosaur eggs to discover the dinosaurs hidden inside.
Sculptured Dinosaurs
Materials:
- Playdough or Crayola Model Magic
- Plastic dinosaur figures
- Dinosaur skeleton models or pictures
Instructions:
Invite students to create their own dinosaur sculptures using playdough or Model Magic.
Students can shape the bodies, heads, tails, legs, and other features of their dinosaurs.
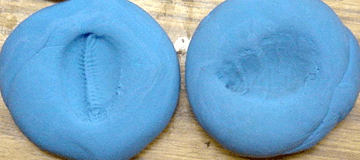
As an alternative, have students press plastic dinosaur figures or other objects into flattened dough to create pretend fossil impressions.
Allow Model Magic creations to dry so students can display their dinosaur sculptures or fossils.
Museum Dinosaur
Materials:
- Styrofoam packing peanuts
- Thin craft wire or floral wire
- Paper plates
Instructions:
- Thread four strands of thin wire through the bottom of a paper plate to create the dinosaur’s legs.
- String Styrofoam packing peanuts onto the wires to form the legs.
- Twist additional wires together to create the dinosaur’s body, tail, and neck.
- Thread more packing peanuts onto the wire framework to complete the dinosaur.
- Adjust the shape to give the dinosaur its own unique appearance.
- Display the completed dinosaurs in a classroom “Dinosaur Museum.”
This project works best with the assistance of a creative adult helper who can shape and secure the wire framework.
Safety Note: An adult should handle and secure the wire ends. Packing peanuts can pose a choking hazard, so use this activity with appropriate supervision and age groups.
Recipes and Snacks
Dinosaur Dig
Ingredients:
- Gummy dinosaurs
- Fruit Loops cereal
- Small cups
Instructions:
- Give each student a small cup and a gummy dinosaur.
- Have students place the gummy dinosaur at the bottom of the cup.
- Fill the cup with Fruit Loops cereal, completely hiding the dinosaur.
- Let students “dig” through the cereal, eating their way down to discover the hidden dinosaur.
Check for food allergies and choose age-appropriate treats.
Triceratops Treats
Materials:
- Small treat bags
- Popcorn or dinosaur-themed treats
- Paper or cardstock
- Triceratops pictures or bag topper templates
Instructions:
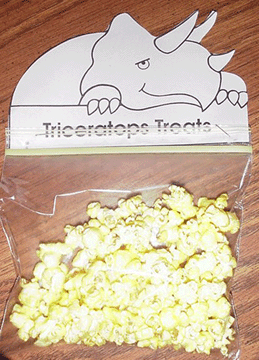
- Create a bag topper featuring a Triceratops illustration and the words “Triceratops Treats.”
- Fill small treat bags with popcorn or other dinosaur-themed snacks.
- Fold the bag toppers over the openings and staple or secure them to the bags.
These treats make fun snacks or take-home favors for a dinosaur-themed classroom celebration.
For preschool-aged children, choose an age-appropriate snack instead of popcorn, which is a choking hazard for children under 4.
Dinosaur Food
Create a dinosaur-themed snack using ingredients representing dirt, swamp water, crushed bones, and more.
Find the complete activity instructions at Dinosaurs Unit by The K Crew.
Dino Bones
Ingredients:
- 1 cup peanut butter
- 1 cup dry milk
- 2 tablespoons honey
- Crushed graham crackers
Instructions:
- Combine the peanut butter and dry milk in a mixing bowl.
- Add the honey and mix well.
- Divide the mixture into equal portions.
- Shape each portion into a dinosaur bone.
- Sprinkle the bones with crushed graham crackers.
Check for peanut and dairy allergies before preparing this snack.
Hatching Eggs
Ingredients and Materials:
- Green jelly beans
- Gummy dinosaurs
- Paper cupcake liners
Instructions:
- Give each student a paper cupcake liner to represent a dinosaur nest.
- Place several green jelly beans inside each nest to represent dinosaur eggs.
- Add a gummy dinosaur on top of each nest, as though it is waiting for the eggs to hatch.
Choose age-appropriate treats, as jelly beans and gummy candies can present choking hazards for young children.
Dinosaur Dirt Digs
Ingredients and Materials:
- Instant chocolate pudding
- White chocolate chips
- Crushed chocolate cookies
- Clear plastic cups
- Spoons
Instructions:
- Prepare the instant chocolate pudding according to the package directions.
- Mix white chocolate chips into the pudding to represent buried dinosaur bones.
- Spoon the pudding mixture into clear plastic cups.
- Sprinkle crushed chocolate cookie crumbs over the top to create a layer of dirt.
- Give each student a spoon to use as a pretend shovel.
Students can enjoy their dinosaur dirt digs as they excavate the hidden “bones” from their pudding.
Check for food allergies and use age-appropriate ingredients.
Fun Activities
Dinosaur Day
Plan a special Dinosaur Day with learning centers set up around the classroom.
Have students rotate through the centers to participate in different dinosaur-themed activities.
Suggested Dinosaur Day Centers:
Bone Bank
Students practice recognizing letters, words, or numbers written on paper dinosaur bones before depositing them into their Bone Banks.
See the Bone Bank activity in the Literacy section.
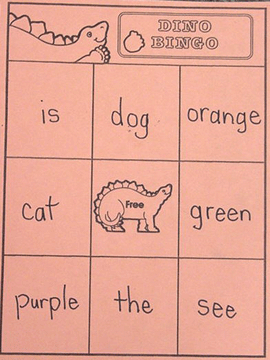
Dino Bingo Game
Create dinosaur-themed bingo cards featuring a dinosaur picture in the free space.
Students play bingo using the cards and markers.
Additional Dinosaur Day Centers
Dinosaur Trading Cards
Students explore, sort, and trade dinosaur fact cards.
See Dinosaur Trading Cards in the Science section.
Dino Hop Game
Students practice counting and number recognition as they move a toy dinosaur along a numbered path.
See Dino Hop Game in the Math section.
Triceratops Treats
Students enjoy dinosaur-themed snacks packaged in bags with Triceratops toppers.
See Triceratops Treats in the Recipes and Snacks section.
Dino Pokey
Tune: “The Hokey Pokey”
You put your claws in,
You put your claws out,
You put your claws in,
And you scratch ’em all about!
You put your feet in,
You put your feet out,
You put your feet in,
And you stomp them all about!
You put your teeth in,
You put your teeth out,
You put your teeth in,
And you chomp them all about!
You put your tail in,
You put your tail out,
You put your tail in,
And you wag it all about!
Dino Treasure Hunt
Materials:
- Paper dinosaur footprints
- A small treasure or dinosaur-themed surprise
Instructions:
- Cut out dinosaur footprints from construction paper.
- Arrange the footprints around the classroom to create a trail.
- Hide a treasure at the end of the trail.
- Have students follow the dinosaur footprints to discover the hidden treasure.
Be a Stegosaurus
Materials:
- Large paper grocery bags
- Construction paper
- Crayons or markers
Instructions:
Use paper grocery bags to create a group Stegosaurus costume.
Assign one student to be the dinosaur’s head, another to be the tail, and the remaining students to represent the Stegosaurus’s back plates.
Have students work together to form one giant Stegosaurus and move around the classroom as a team.
Pin the Horn on the Dinosaur
Materials:
- Large Triceratops picture or pattern
- Paper dinosaur horns
- Tape or reusable adhesive
- Blindfold (optional)
Instructions:
- Enlarge a Triceratops pattern and display it on a wall.
- Create separate paper horns for students to attach.
- Have students take turns trying to place the horn in the correct position on the dinosaur.
Play this game in the style of the traditional “Pin the Tail on the Donkey.”
Dinosaur Names
Materials:
- Construction paper strips
- Dinosaur stamps
- Ink pads
- Crayons or markers
- Tape or staples
Instructions:
- Cut construction paper into strips to make headbands.
- Help students create their own dinosaur names.
- Write each student’s dinosaur name on their headband.
- Let students decorate their headbands using dinosaur stamps, crayons, or markers.
- Fit and secure the headbands for students to wear during dinosaur activities.